
Manufacturer Overview
Casio was one of the very first companies to produce digital cameras for consumers, and their original QV-10 digicam introduced digicam users to the wonders of LCD viewscreens. What a concept! It's become almost mandatory these days, but back when the QV-10 was first introduced, the feature was a real eye-opener.
Highlights
- 1.3 megapixel CCD delivering up to 1280 x 960 pixel images.

- 2.5 inch low glare, Hyper Amorphous TFT color LCD panel (122,100 pixels at 555 x 220).
- F/3.2-3.5, 6 to 48mm, 8x zoom(!), swivel lens (equivalent to a 40 to 320mm on a 35mm camera).
- 2x/4x digital zoom.
- Apertures of F/3.2, F/4.8 and F/8.
- Shutter speed options from Bulb to 64 (!) to 1/2000 seconds.
- Multi-pattern, spot and center weighted exposure metering options.
- Exposure compensation from -2 to +2 EV in 0.25 EV increments.
- Program AE, Aperture Priority, Shutter Priority, and Full Manual exposure modes.
- Contrast detect TTL autofocus with manual and infinity focus modes as well as focus lock.
- Panorama mode supports full 360 degree in-camera display.
- White balance with four modes.
- Built-in flash with four modes (Auto, On, Off and Red-Eye Reduction).Multi-pattern, center point and spot metering modes
- Movie and still capture modes.
- USB and serial connections.
- Wired remote control.
- DPOF (Digital Print Order Format) compatibility for image printing.
- Image capture in JPEG (Exif.Ver.2.1) for still images and AVI files for movie images
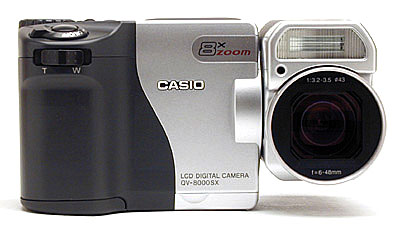
Casio labels the QV-8000SX as a "versatile" digital camera on its packaging, and the product certainly lives up to that billing. It boasts a plethora of features and operating modes, including a full 8x optical zoom lens that swivels separately from the body, flexible exposure options, including aperture and shutter-priority autoexposure calculation, time exposures up to 64 seconds(!) and much more. Here's a quick rundown of the major camera features; see the individual sections of the full review for more detail.
We really like the rotating lens concept (invented by Casio, introduced way back in digicam prehistory on their original QV-10), and would like to see it adopted by more manufacturers. The fact that the lens doesn't protrude very much from the camera body is another plus, keeping the entire camera reasonably compact and pocketable (for large pockets, at least). Additionally, the camera is quite lightweight (due to its all plastic body), adding to its portability. Control-wise, all the buttons and levers are laid out so that one handed operation is possible (a definite benefit in some shooting situations).
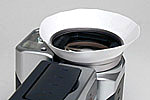
The QV-8000SX relies solely on its LCD for viewfinder operation, making it harder to use in very bright conditions, and also eliminating the power-saving option of using the camera with the LCD turned off. (We're big proponents of the dual optical/LCD viewfinder approach, as seen in Casio's QV-2000UX, which we reviewed previously.) The lack of an optical viewfinder also makes it more difficult to take advantage of the astonishing low-light capability of the QV-8000, since the live LCD viewfinder display only requires a moderate amount of light to work. For all that, the LCD is at least big and bright, at 2.5 inches and 122,100 pixels. An information display of camera settings and options can be canceled and recalled by hitting the Display button, with the exception of the flash mode icon and center focus target mark, which are always present. We were pleased with the optional grid function that superimposes a grid of light gray lines over the LCD image, significantly assisting with image composition and alignment.
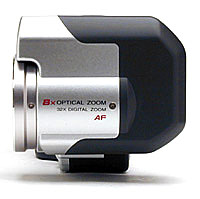
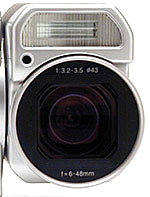
The QV-8000SX has a 6 to 48mm, 8x zoom lens (equivalent to a 40 to 320mm lens on a 35mm camera). As we mentioned earlier, the lens actually swivels a full 270 degrees, enabling you to point the lens all the way back at yourself (useful during self-timer shots so you can see the countdown on the LCD panel). Filter threads on the inside lip of the lens accommodate 43mm diameter filters. Focus ranges from 1.3 feet (0.4m) to infinity at the wide angle end and from 3.3 feet (1m) to infinity at the telephoto end. In macro mode, focus ranges from 0.4 to 19.7 inches (1 to 50 cm) with auto focus and from 3.9 inches (10cm) to infinity with manual focus. The aperture can be manually or automatically controlled, with options of F/3.2, F/4.8 and F/8. A manually controlled 2x or 4x digital zoom option extends the optical zoom (8x) capabilities up to 32x, but with lesser image quality as a side effect. Focus options include Manual and Infinity modes.
The QV-8000SX is unusual in that it provides both fully automatic and optional manual exposure modes. You thus have full auto, aperture or shutter priority, or full manual exposure options. Programmed modes such as Night Scene, Portrait and Landscape set up the camera for special shooting, saving time with preset options.
A built-in flash offers four operating modes: Auto, On, Off and Red-Eye Reduction. Auto puts the camera in control of the flash; On fires the flash with every exposure; Off completely suppresses the flash and Red-Eye Reduction emits a small pre-flash before firing the full flash to prevent the Red-Eye Effect. Normal flash power provides a working range from 1.6 to 8.2 feet (0.5 to 2.5m) and from 0.3 to 1.6 feet (0.1 to 0.5m) in macro mode and flash intensity is adjustable, with Strong, Normal or Weak settings.
Six white balance modes (Auto, Daylight, Shade, Tungsten, Fluorescent and Manual) are available. Automatic mode lets the camera govern white values based on existing light. Daylight, Shade, Tungsten and Fluorescent settings adjust white balance for various natural and artificial light values. Probably the most accurate when shooting under artificial light, the Manual setting sets the white value based on a sheet of white paper held in front of the lens.
Other exposure options include exposure compensation (EV adjustment), adjustable from -2 to +2 EV in .25 EV increments, resetting after each shot. Three metering options include Multi, Center and Spot settings. Multi averages the exposure based on the entire image while Center averages the values from a large area in the center of the image. Spot metering determines the exposure value from a small spot directly in the center of the frame.
The Quick Shutter and Continuous Recording options enable you to catch fast paced action shots. Quick Shutter records up to five images in approximately one second intervals with one multiple presses of the shutter button while Continuous Recording captures up to five images at approximately 0.25 second intervals while you hold the shutter button down. Shooting intervals in both modes depend on the image size and resolution and available CompactFlash space. To capture moving action, the movie recording mode records up to 10 second movies in 320 x 240 pixel AVI format. An interesting option here is the Past movie mode, which records events that occurred before the shutter button was pressed (the camera actually records images to a buffer memory and once the shutter button is pressed, copies those images to the CompactFlash).
You can also record a 360 degree panorama image (or up to nine consecutive shots) on the QV-8000SX through the Panorama record mode. A helpful feature is that after the first image is exposed, the right edge of the preceding image remains on the screen to help you line up the next shot properly. Images can be linked together in the camera (for playback only) or on the computer via the included Panorama Editor software (Windows users only).
Other recording options include the ability to record images in monochrome black and white or sepia tones, adding a little creativity to your shots. The self-timer counts down from two or 10 seconds once the shutter button is pressed and a separate timer function allows you to record a series of images at set intervals (from one to 60 minutes and up to 250 shots).
For image playback, US and Japanese models of the QV-8000SX come with an NTSC video connection cable (European models come with PAL) to connect the camera to your television set. If desired, the TV can also be used as a viewfinder when composing images, helpful in manually focusing on macro subjects, or in studio settings where you have to interact with the subject from in front of the camera. (Kid photography, etc.) Playback mode allows you to view images individually or as thumbnails, nine to a screen. You can also play back movies and panoramic images in the camera. A playback zoom feature lets you enlarge images and scroll around within the enlarged view.
Four AA alkaline, lithium or NiMH batteries keep the QV-8000SX running (you can also take advantage of the included AC adapter). Since the lack of the optical viewfinder reduces battery conservation options, we highly recommend keeping a spare set of batteries with you.
USB, serial and Mac adapter cables come with the QV-8000SX, as well as a software CD with PhotoLoader, Panorama Editor, Picture Works MediaCenter, QuickTime, Adobe ActiveShare, Adobe Acrobat Reader, Internet Explorer 5.0 and a trial version of Picture Works Web Publisher. For some reason, Casio only includes software compatible with Windows 95, 98 and NT 4.0, so Mac users must fend for themselves, or order the $10 accessory PhotoLoader program for Macs. When inserted into your computer, the CD displays a detailed menu with options to install the various software applications, read about the applications, register your camera online, go directly to the Casio website, open the accessory listing or fill out an accessory order form. Most of the software included offers relatively basic image correction and manipulation capabilities, but the trial version of Picture Works Web Publisher creates customized web pages that incorporate your QV-8000SX images. Additionally, Adobe Active Share allows you to post images to the ActiveShare.com website for easy viewing by family and friends
In the end, the QV-8000SX offers capabilities that both the novice and the expert photo consumer will appreciate. From the full manual capabilities to complete automatic control, the camera accommodates a variety of users. Plus, its compact shape and light weight make it a portable option for those of you on the go. We confess to some skepticism when we saw the "ultra versatile" billing on the QV-8000's box, but have to admit it's one of the most flexible digicams we've seen to date. (January, 2000).
Design
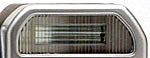
At first glance, the QV-8000SX doesn't look too different from some of the digital camcorders out on the market. We personally like swivel-lens designs, as they give the consumer more shooting flexibility in both still and movie modes. The QV-8000SX's lens actually turns a full 270 degrees, meaning you can point the lens back at yourself! The lens is protected by a lens cap that avoids being a nuisance through its ability to clip onto the wrist/shoulder strap. (A nice little design touch, other manufacturers take note!) As for its other design features, the QV-8000SX gives you a nice hand grip, via the battery compartment, and an overall sleek design. The all plastic body makes the camera surprisingly light weight for its size, at only 11.6 ounces (330g) without the batteries. It's also fairly compact at 5.6 x 3.1 x 2.8 inches (142.5 x 77.5 x 71mm), excluding any protrusions.![]()
![]()
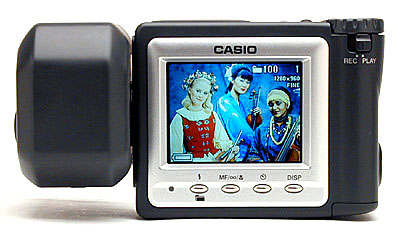
The back panel of the camera features the LCD monitor, various function controls and the Record/Play mode switch. Here too, the design is very minimal with clean lines and shapes.![]()
![]()
![]()
Both sides of the camera are feature free, with the exception of the wrist/shoulder strap attachment on the side opposite the lens.![]()
![]()
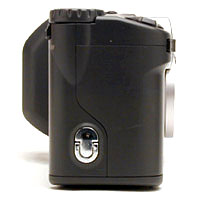
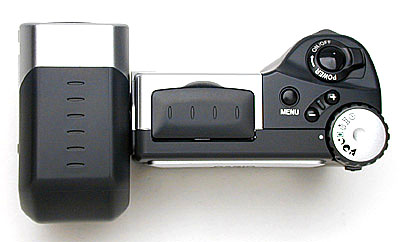
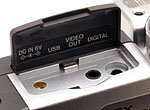
The top of the camera carries the shutter button, power switch, mode dial, menu and various other buttons. The I/O and AC adapter jacks are covered by a plastic flap that snaps closed.![]()
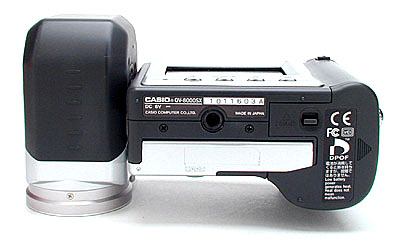
Finally, the bottom of the camera holds the plastic tripod mount, locking battery compartment and CompactFlash slot. One note here is that the placement of the battery and CompactFlash compartments makes it impossible to change out either one while mounted to a tripod (a design issue we notice when doing studio work).
Viewfinder
The QV-8000SX has done away with the optical viewfinder, utilizing the LCD monitor as its sole viewfinder. In some respects, this makes sense since the LCD viewfinder provides a TTL (through the lens) view, and is therefore more true to the captured image. Alternatively, when it comes to power conservation, optical viewfinders really help squeeze the most out of the batteries. Just keep this in mind and have some spare batteries handy. Optical viewfinders are also very handy in both very bright and very dim light, where the image on the LCD can be difficult or impossible to see. The 2.5 inch, low glare, color Hyper Amorphous TFT LCD monitor displays images at 122,100 pixels (555 x 220). An information display can be canceled or recalled by hitting the Display button, with the exception of the flash mode icon and center focus target mark, which are always present. There's also a very handy grid function that can be turned on or off, helping you line up shots. (We really like this optional grid of light gray horizontal and vertical lines, as we've very often ended up with digicam images that were slightly rotated, when we thought everything was nice and level. You can always rotate the photo after the fact in an image editor, but it's preferable by far to avoid the problem in the first place.)
Optics
A 6 to 48mm, 8x zoom lens comes on the QV-8000SX (equivalent to a 40 to 320mm lens on a 35mm camera). This is a much longer zoom ratio than is typical of digicams (most have only a 3x zoom), and we really liked the extra flexibility it affords. It's interesting to note the impact of a longer zoom on the effective camera resolution. Consider the situation where you want to capture a distant object, and want to fill the frame with it. If a 3x zoom will do that, then a 2 megapixel camera clearly wins the resolution war, with 1600 pixels horizontally. Suppose though, that the subject is twice as far away: The 3x zoom on a 2 megapixel camera ends up only delivering 800 pixels worth of resolution on the subject itself (assuming that it now only fills half the frame). Compare this to the QV-8000, which could zoom out to 6x, and fill the frame with the subject, devoting the full 1280 pixels to it. In this case at least, the QV-8000 actually delivers more useful resolution than the 2 megapixel model. Then consider that the QV-8000 goes all the way out to 8x! For distant subjects (wildlife?), the QV-8000 is actually a better choice than a 2 megapixel camera with only a 3x zoom (or even a 5x zoom).
We really liked swiveling lens on the QV-8000, which rotates a full 270 degrees, letting you point the lens all the way back at yourself, straight down or anywhere in between. Filter threads on the inside lip of the lens allow you to attach 43mm diameter filters or accessory lenses. Focus ranges from 1.3 feet (0.4m) to infinity at the wide angle end and from 3.3 feet (1m) to infinity at the telephoto end. In macro mode, focus ranges from 0.4 to 19.7 inches (1 to 50 cm) in auto focus and from 3.9 inches (10cm) to infinity in manual focus mode. Aperture can be manually or automatically controlled, with options of F/3.2, F/4.8 and F/8.
The 1cm minimum focusing distance in Macro mode can produce some really amazing close-ups. The zoom lens seems to have a much more limited range of focal lengths in macro mode (we'd guess it's only about a 1.2x zoom at that setting), but the detail the camera can capture is incredible: The minimum capture area is an amazing 0.71 x 0.95 inches (18 x 24 mm). The only limitation we found with this incredible macro capability is that the width of the lens itself can make it difficult to get adequate light into the subject: You may find it helpful to make a conical "light tent" out of a piece of white paper or diffusion material, as shown at right. With this sort of arrangement, you can shine lights onto the diffusion material from multiple angles, and obtain very even illumination, despite the extremely short working distance. You do pay one price for the extraordinary macro capability: At the shortest focusing distances, the lens appears to suffer from considerable "curvature of field", which means that the corners of the image will be out of focus when the center is sharp. This effect is most noticeable at the 1cm focusing distance, decreasing as you move out to greater distances.
A 2x / 4x digital zoom option extends the 8x optical zoom capabilities up to 32x, but the image quality always suffers as a result of digital enlargement. Digital zoom automatically saves images at the 640 x 480 pixel size. The QV-8000SX offers manual focus and Infinity modes, both accessed by a control button beneath the LCD monitor. Manual focus is adjusted by the plus and minus buttons on top of the camera, after pressing the MF button under the viewfinder. After a few seconds though, the +/- buttons return to their normal exposure-compensation function. No focus feedback is provided other than the view in the LCD: For fine focusing, we'd like the option of having feedback from the camera, or at least being able to see a magnified view in the LCD. Infinity mode sets the focus at infinity for quick shooting of far away subjects.
Exposure
Exposure control on the QV-8000SX can be fully automatic, or you can take advantage of several programmed modes. Aperture and Shutter Speed Priority modes allow you to control either the aperture and the shutter speed individually or both at the same time (full manual). In the menu system, both aperture and shutter speed have entries with options of "Auto", or several manual settings. Picking a manual setting for aperture, but leaving the shutter option set to auto results in "aperture priority" metering. The opposite set of choices produces "shutter priority" metering. Manually selecting values for both settings gives you full manual exposure control, a very rare commodity in the digicam marketplace. Additionally, program modes such as Night Scene, Portrait and Landscape save time when shooting in special situations. While in full automatic mode, you have the ability to change white balance, exposure compensation (EV) and the flash. You also have control over image sharpness, color saturation and image contrast through the Record Details menu. Here's a more detailed description of the QV-8000SX's exposure options:
Flash
The built-in flash on the QV-8000SX resides directly on top of the lens, so that when the lens spins around, so does the flash. This is convenient, and almost mandatory for a rotating-lens design like the QV-8000, but the close proximity of the flash tube to the lens makes it much more difficult to eliminate the red-eye effect in shots of people. Four flash modes are available: Auto, On, Off and Red-Eye Reduction. Auto mode puts the camera in charge of judging light levels and whether or not to fire the flash. The On setting fires the flash with every exposure and the Off setting prevents it from firing at all. Red-Eye Reduction mode emits a small pre-flash before firing the full flash to help prevent the occurrence of the Red-Eye Effect. Working range for the flash runs from 1.6 to 8.2 feet (0.5 to 2.5m) in normal, wide angle mode and from 0.3 to 1.6 feet (0.1 to 0.5m) in macro mode. An icon on the LCD monitor clues you in to the selected flash mode, which is changed by pressing the Flash button until the desired icon appears (Auto mode has no icon). Flash intensity can be changed via the Record Details menu, with options of Strong, Normal and Weak.
We'd loved to have seen an option for external flash on the QV-8000, given the extraordinary flexibility it offers otherwise. The good news here though, is that its flash is a "single pop" design, producing only a single flash in normal operating mode. This makes it easy to use with conventional optical strobe triggers for use with external flash units. (Many digicams produce a double flash in normal exposure mode, the first "pop" being used for white balance and metering, and the second making the actual exposure. These cameras require special "smart" triggers to sync properly with external strobes.)
White Balance
Six white balance modes are available on the QV-8000SX: Auto, Daylight, Shade, Tungsten, Fluorescent and Manual. In Automatic mode, the camera assesses light type and levels and assigns the appropriate white values. Daylight, Shade, Tungsten and Fluorescent settings all do as they sound by adjusting white balance for varying natural and artificial light sources. Manual white balance allows you to set the white value based on a sheet of white paper held in front of the lens (usually the most accurate in special lighting situations). A little-known benefit of manual white balance options like this is that you can use them to deliberately introduce color casts into your images, by using off-white objects as your reference targets: Experiment with this a bit, and see what happens!
Exposure Compensation (EV adjustment)
To adjust for lighter or darker exposures, exposure compensation (EV adjustment) is adjustable from -2 to +2 in .25 EV increments. The setting is only good for one exposure, as the EV value automatically reverts to zero once the shutter button is pressed.
Metering
The QV-8000SX allows you to change exposure metering options via the Record Details menu with options of Multi, Center and Spot. The Multi setting takes readings from the entire image and then bases the exposure on the average of those values. Center weighted metering averages the values from a large area in the center of the image. Spot metering takes the exposure value from a reading at the direct center of the image. Unlike the EV adjustment setting, the metering setting can not only persist from shot to shot, but from one shooting session to the next, even if the camera is powered down in the interim. You can select whether or not the camera remembers the metering preference via a setting on the "Mode 2" options menu.
Quick Shutter
The Quick Shutter function allows you to record up to five images at approximately one second intervals (depending on image information and memory card space) with one press of the shutter button. The mode can be used in Automatic, Night Scene, Landscape or Portrait recording modes. As you shoot, the camera continuously processes the images you've already captured in the background, saving them to the memory card. When you pause, the camera "catches up" with you, and when you shoot rapidly, you get ahead of it. The camera displays the current status of the memory buffer (temporary image storage) as you shoot and it processes, via a set five small circles in the LCD viewfinder. Filled-in circles indicate full memory spaces, empty ones indicate space available. We found both the Quick Shutter mode and this memory-usage feedback very useful in our shooting: It's nice to know what's going on inside the camera, and it helps you plan your shots a bit.
Continuous Recording
The Continuous Recording option allows you to record up to five images at approximately 0.25 second intervals with one press of the shutter button (depending on the image information and CompactFlash space). Like Quick Shutter, Continuous Recording is available in Automatic, Night Scene, Landscape and Portrait recording modes. Flash is unavailable in this mode and focus and exposure settings are locked with the first image.
Movie Recording
The QV-8000SX allows you to record movies approximately 10 seconds long in 320 x 240 pixel AVI format. The Past Movie mode allows you to capture events that occurred before the shutter button was pressed, meaning that the camera actually continuously records images into a buffer and once the shutter button is pressed, records the information to the CompactFlash memory card. Normal Movie mode simply starts recording at the press of the shutter button and stops when the button is let go. (The Past Movie mode is really mind-boggling for people who haven't seen anything like it before. "How does the camera know when you're going to press the trigger?" is a common question. - Great fun for parties!)
Panorama Recording
You can record a 360 degree panorama image on the QV-8000SX through the Panorama record mode. A total of nine consecutive images can be recorded in the panoramic series. After the first image in the series is shot, the right edge of the preceding image remains on the screen to help you line up the next shot. You can actually record more images in a series by recording the first nine, uploading them to a computer and then recording more. The images can then be linked in Windows based computers via the included Panorama Editor software. What's really slick though, is that you can actually preview the panoramas you've shot while the images are still in the camera! When the camera is in panorama mode, there's a playback option by which the camera performs a crude stitching operation all by itself, and then displays the resulting panoramic image on the LCD for you to scroll around in at will. Very slick!
Night Scene Mode
The Night Scene mode records subjects with dark backgrounds. The slowest shutter speed available in this mode is one second, but a slower one can be set in Shutter Speed Priority mode (up to 64 seconds). We confess to not being sure exactly what the Night Scene mode is actually doing, since it doesn't appear to increase CCD sensitivity at all. It does however, bias the camera toward slower shutter speeds, even when the flash is used. This equates to a "slow synchro" mode, which allows more ambient light into pictures taken with flash. (This is useful for brightening backgrounds and avoiding the stark silhouettes that on-camera flashes can produce.)
Landscape Mode
Per the description in the QV-8000's manual, landscape mode sets the focus and aperture so that everything from background to foreground is in focus simultaneously. A more photographic description would be that it biases the camera's exposure system to use smaller lens apertures, producing greater depth of field. (This would also be useful for macro shooting, something you'd never guess from the mode's name and description in the manual.)
Monochrome and Sepia Recording
Monochrome and sepia expand your creative options by letting you record images in black and white or sepia tones. Once recorded in monochrome, images cannot be converted back to color.
Portrait Recording
Portrait mode adjusts the focus and aperture so that the subject is in focus and the background is slightly blurred. (Just the opposite of "Landscape Mode" above: It biases the camera to use wider apertures, producing shallower depth of field.)
Self-Timer
The self-timer on the QV-8000SX gives you a two or 10 second countdown before firing the shutter once the shutter button is pressed. You can swivel the lens around during self-timer recording to see the countdown on the LCD monitor. - Very helpful to keep everybody clued in as to when the shutter is actually going to release.
Timer
The Timer function allows you to record a series of images at set intervals (from one to 60 minutes) with approximately 250 maximum shots available depending on the amount of CompactFlash space. (Very neat feature, for time-lapse photography!)
Shutter Speed Priority
Shutter Speed Priority mode allows you to control the shutter speed from 64 to 1/2000 seconds. The Bulb setting keeps the shutter open for as long as the shutter button is held down (up to 64 seconds). The included wired remote control works best with the Bulb setting, preventing any slight camera movement due to pressing the shutter button. Casio also notes that with slower shutter speeds, the chance of image static or noise increases.
This would be a good point to talk about the QV-8000's absolutely amazing low-light capability: When we first saw the specs for the camera, we almost laughed - Who were they trying to kid? 64 seconds? 64 seconds?! All you'd see would be colored snow! When we actually shot some very long time exposures with the camera though, we were totally humbled: It really *can* take long exposures like that! We didn't actually take a 64 second shot, but we did go all the way out to 48 seconds in our studio tests, and the results absolutely blew us away! The images were cleaner than those from most other cameras when trying for a 4 second exposure, let alone a 48 second one! We could see some of what Casio's doing, in that they evidently capture a "black-reference" image immediately after the time-exposure shot itself, and using it to subtract-out the noise. (You'll notice that time exposures actually take about twice as long to complete as the shutter speed selected would indicate. The extra time is that required for the black-reference image to be captured.) Still, even allowing for this trick, Casio must have come up with something genuinely new: Other manufacturers have used the black-reference approach before, but nobody has gotten the noise down to the level that Casio has achieved here. Whatever they're doing also bodes well for future, higher-resolution cameras, because image noise becomes an increasing problem as pixel counts scale higher and the individual pixel sensors become smaller on the CCD.
Overall, the QV-8000 completely captures the low-light picture-taking crown, at least as of this writing in January, 2000. Nothing else we've seen to date even comes close to it: If you're looking for a digicam to experiment with long time exposures, the QV-8000 is it. Don't even bother looking at anything else!
One fly in the ointment: The QV-8000 does have one major shortcoming for low-light photography though. As we noted earlier, the LCD viewfinder is completely non-functional under even moderately dim conditions. Some kind of optical viewfinder absolutely should have been included on the unit, and its lack makes low-light work rather difficult. (Plan on jerry-rigging some sort of gunsight-type framing guide atop the lens housing for any serious low-light work.)
Aperture Priority
An alternative to Shutter Speed Priority, Aperture Priority allows you to set the lens aperture at F/3.2, F/4.8 or F/8.
Full-Manual Mode
Not actually a separate camera mode, but worth mentioning because the capability is so sought-after, and so surprisingly rare in current digicams. On the QV-8000, you can set the shutter speed and aperture completely independent of each other, and aren't required (as on some cameras) to have one under the camera's control if you're manipulating the other. Very nice!
Shutter Lag / Cycle Times
When you press the shutter release on a camera, there's usually a lag time before the shutter actually fires. This time allows the autofocus and autoexposure mechanisms to do their work and can amount to a fairly long delay in some situations. Since this number is almost never reported on, and can significantly affect the picture taking experience, we now routinely measure it using a special electronic test setup that's accurate to 0.01 seconds.
The QV-8000 is actually fairly quick, as digicams go: A full autofocus cycle results in a shutter lag of only about 0.85 seconds: Not blazingly fast, but certainly not bad by comparison with competing cameras. If the lens is prefocused by half-pressing the shutter button prior to the shot itself, the shutter delay drops to only 0.15 seconds, a very good number indeed. Using manual focus, the shutter delay is 0.20 seconds.
Shot-to-shot cycle times are also quite good, particularly when using the Quick Shutter mode. We clocked the camera at 1.6 seconds shot-to-shot using manual focus in high resolution mode and 1.53 seconds shot-to-shot in low resolution mode. Autofocus would presumably add about 0.6 seconds to these times. We never managed to fill the memory buffer in low-resolution mode, as it emptied quicker than we could take the next shot. In high resolution mode, we managed 10 shots before the buffer filled, and even then, cycle time only rose to 3 seconds. In continuous mode, the camera captured five frames in 1.09 seconds, a frame rate of 3.67 frames per second, reasonably close to the 4 frames per second claimed by Casio.
The camera also starts up in only 4.24 seconds (from "off" to the first shot acquired), switches from record to play mode in anywhere from 1 to 3.5 seconds (depending on the resolution mode and how much processing it needs to do on the current image), and switches back from play to record mode in 1.4-2.0 seconds (from playback to the first image captured).
Overall, we found the QV-8000 surprisingly quick compared to the current crop of cameras (January 2000), particularly competing 1.3 megapixel models.
User Interface
The QV-8000SX offers uncomplicated menu navigation through a series of 3D graphic menus typical of Casio's standard user interface. It shares the visually attractive interface design we reported on earlier in our coverage of the QV-2000UX. The placement of function controls allows for one handed operation if necessary, but two hands is always easier. Here's a look at the individual controls:

Shutter Button
Located on top of the camera, in the center of the circular power toggle switch. In all record modes, the shutter button sets focus and exposure when half pressed and fires the shutter when fully pressed. When navigating through menus, the shutter button acts as the OK button to accept menu selections.
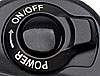
Power Switch
Located on top of the camera, this circular switch toggles back and forth to turn the camera on and off.
Zoom Control
Located on the front of the camera, about where your right index finger would wrap around the grip, this slide control operates the zoom lens. If the digital telephoto control option is set to "auto", pressing the zoom control toward "T" again after the lens has reached its maximum telephoto setting engages the digital zoom function. Pressing it again increases the digital zoom from 2x to 4x.

Menu Button
Located on top of the camera, this button accesses the menu system for whatever camera mode is currently selected. It also acts as the cancel button when navigating through the menus.

+/- Buttons
Located on top of the camera, these buttons are marked with a + and - sign.
- In both Record and Playback modes, they navigate through menu selections.
- In Record mode, they control exposure compensation (EV) and manual focus settings.
- In Playback mode, they scroll through captured images on the CompactFlash card.

Mode Dial
Located on top of the camera, this notched dial selects between the following modes:
 Timer: puts the camera in Timer mode for recording a series of images at selected time intervals.
 Panorama Mode: sets up the camera for recording panoramic images.
 Movie Mode: records up to 10 second movies as 320 x 240 AVI files.
 Normal Mode: puts the camera in standard, automatic capture mode.
 Night Scene Mode: sets up the camera for recording subjects in dark areas and backgrounds.
 Portrait Mode: adjusts focus and aperture for portraits-where the subject is in focus and the background is slightly blurred.
 Landscape Mode: adjusts focus and aperture so that foreground and background are both in focus.

Rec/Play Switch
Located beneath the Mode Dial, on the back panel of the camera, this switch selects between Record and Playback, for each of the major camera operating modes listed above.![]()
![]()
Display Button
Located at the bottom right of the LCD monitor, this button cancels and recalls the information display on the monitor. In the Record menu, this button switches between the normal and Details menu systems.![]()
![]()
Self-Timer Button
Marked with the standard "clock" icon, and located beneath the LCD monitor, to the left of the Display button, this button cycles between two second self-timer, 10 second self-timer and self-timer off modes.![]()
![]()
Manual Focus / Infinity / Macro Button
Located beneath the LCD monitor, to the left of the Display button, this button cycles between Manual Focus, Infinity and Macro modes.![]()
![]()
Flash / Folder Button
Located at the bottom left of the LCD monitor, marked with the traditional flash symbol and a black folder icon.
- In Record mode, this button selects the desired flash mode from Auto, On, Off and Red-Eye Reduction.
- In Playback mode, this button allows you to select a different folder on the memory card for playback.
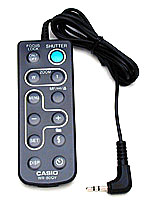
Wired Remote
The QV-8000SX is unusual in that it includes a wired remote control unit in the box with the camera. Few cameras include remotes, but we find them very handy for studio or macro work, where you don't want to disturb the camera (presumably mounted on a tripod) by pressing the button. A remote can also give you more freedom to work with the subject from in front of the camera, without having to run back and forth. The cable on the QV-8000's remote is only a few feet long, but still very useful for situations where you don't want to jostle the camera/tripod setup. The QV-8000's remote is also unusual in the degree of control it gives you over the camera: Most remotes only provide a subset of on-camera functions, but the QV-8000's remote lets you control every aspect of the camera's operation, duplicating all the on-camera controls (except the record/play toggle).![]()
Camera Modes and Menus![]()
Timer Mode
Accessed by turning the mode dial to the black timer symbol, this mode allows you to capture a series of up to 250 images at anywhere from one to 60 minute intervals. (Note that you almost certainly will want to run the camera from the AC adapter when shooting long time-lapse sequences.) Putting the camera in this mode automatically calls up the Timer Setting menu with these options:
- Shots: choose from one to 250 shots.
- Interval: choose from one to 60 minutes.
- Start Time: sets the start time for recording. (You can delay the start of the sequence up to 24 hours, using the camera's 24-hour clock.)
Panorama Mode
Sets up the camera to record up to nine images in secession to compose a panoramic image. Pressing the Menu button in this mode calls up a series of menus. These menus are identical to those used in the other recording modes, so we'll cover them here, and then just once, here. The QV-8000SX has two sets of menus: The default set, providing a somewhat simpler interface, but more limited functions, and the "Details" version, which gives access to the camera's more advanced features. In this section, we'll show the default menu first, followed by some of the sub-menus from the Details mode.![]()
Record Menu 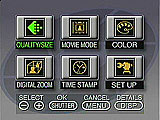
- Quality/Size: selects between Fine, Normal and Economy qualities and between 1280 x 960 or 640 x 480 image sizes.
- Movie Mode: selects between Normal and Past movie recording modes.
- Color: selects between Color, Black and White and Sepia recording modes.
- Digital Zoom: sets the digital zoom to Off, Auto, 2x or 4x.
- Time Stamp: sets the format of the time stamp that can be applied to your images, and turns it on or off.
- Setup: sets the following camera options:
- Card Browser: sets the card browser file type. (A very interesting feature: See our comments in the "Image Storage and Interface" section below.)
- Format: formats the CompactFlash card.
- Date: sets the camera date and time.
- Video Out: sets the video output signal to NTSC or PAL.
- Language: sets the camera language to either English or Japanese.
- Beep: turns the camera beep on and off.
Hitting the Display button while in the Record menu pulls up the Details menu with these sub-menus:![]()
Picture Menu 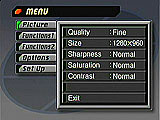
- Quality: sets the image quality to Fine, Normal or Economy.
- Size: sets image size to 1280 x 960 or 640 x 480.
- Sharpness: sets image sharpness to Hard, Normal or Soft.
- Saturation: sets color intensity to High, Normal or Low.
- Contrast: sets image contrast to High, Normal or Low.
Functions 1 menu 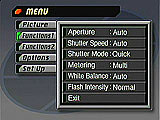
- Aperture: sets the aperture to F/3.2, F/4.8 or F/8.
- Shutter Speed: sets the shutter speed to Auto or Manual (with options of Bulb and timed exposures from 64 to 1/2000 seconds).
- Shutter Mode: selects between Single, Quick and Continuous shooting modes.
- Metering: selects between Multi, Center and Spot metering options.
- White Balance: selects between Auto, Daylight, Shade, Tungsten, Fluorescent and Manual white balance settings.
- Flash Intensity: sets the flash intensity to Strong, Normal or Weak.
Functions 2 Menu 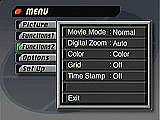
- Movie Mode: selects between Normal and Past movie recording modes.
- Digital Zoom: turns the digital zoom on or off and sets it to Auto, 2x and 4x.
- Color: selects between Color, Black and White and Sepia recording modes.
- Grid: turns an on-screen alignment grid on and off. (Very handy for aligning shots!)
- Time Stamp: turns the time stamp function on and off and sets the format.
Options Menu 
- Power Save: sets power save options for conserving battery power: Sleep (Off, 30 seconds, one minute or two minutes) and Auto Power Off (Off, two, five or 10 minutes).
- Mode 1: specifies which of the following settings are retained when the camera is powered off: Focus, Flash and Digital Zoom.
- Mode 2: specifies which of the following settings are retained when the camera is powered off: Metering, White Balance, Flash Intensity, Aperture and Shutter Speed.
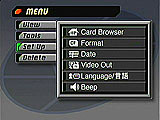
Setup Menu 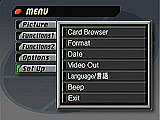
- Card Browser: sets the card browser file type.
- Format: formats the CompactFlash card.
- Date: sets the camera date and time.
- Video Out: sets the video output signal at NTSC or PAL.
- Language: sets the camera language at either English or Japanese.
- Beep: turns the camera beep on and off.
Movie Record Mode
Accessed by turning the mode dial to the black movie camera icon, this mode allows you to record up to 10 second movies (depending on available CompactFlash memory space). Pressing the Menu button in this mode pulls up the same Record and Details menu as in Panorama mode.![]()
Normal Record Mode
Accessed by turning the mode dial to the green rectangular symbol, this option selects the QV-8000's default operating mode. Pressing the Menu button pulls up the same Record and Details menus, which means you can control aperture or shutter speed if desired, although the default is a fully-automatic (commonly called "program") mode, in which the camera controls all exposure parameters..![]()
Night Scene Mode
Accessed by turning the mode dial to the black moon and star symbol, this mode sets up the camera for recording images of subjects with dark backgrounds, as we described earlier in the "Exposure" section. Pressing the Menu button in this mode pulls up the same Record and Details menus.![]()
Portrait Mode
Accessed by turning the mode dial to the black portrait symbol, this mode sets the aperture and focus so that the subject is in focus and the background is slightly blurred. (A bias toward wider lens apertures.) Pressing the Menu button in this mode pulls up the same Record and Details menus as in the other modes.![]()
Landscape Mode
Accessed by turning the mode dial to the black landscape symbol, this mode sets aperture and focus so that both the foreground and background are in focus simultaneously. (A bias toward smaller lens apertures.) Pressing the Menu button pulls up the same Record and Details menus.![]()
Playback Mode
Accessed by switching the Rec/Play switch to the Play position in any camera operating mode, this sub-mode allows you to view captured images and movies in any camera recording mode. Pressing the Menu button in this mode pulls up the Playback menu with the following sub-menus:![]()
View Menu 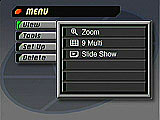
- Zoom: enlarges the image on the LCD monitor screen. You can scroll around the enlarged view by pressing the +/-, flash, or MF buttons.
- 9 Multi: displays nine thumbnail images on the screen at one time. This is handy for rapidly stepping through all the pictures on the memory card.
- Slide Show: automatically scrolls through captured images, one at a time.
Tools Menu 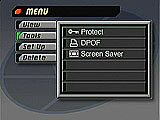
- Protect: protects images against deletion (single image, folder or all). (Note that "protected" images will still be deleted if the memory card is reformatted.)
- DPOF: specifies images for printing (single image, folder or all).
- Screen Saver: turns the camera's screen saver function on or off.
Delete Menu 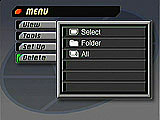
- Select: deletes a single image.
- Folder: deletes an entire folder.
- All: deletes all images on the CompactFlash card.
Setup Menu
- Card Browser: selects the card browser file type.
- Format: formats the CompactFlash card.
- Date: sets the date and time as well as sets the display format for the date and time.
- Video Out: selects between NTSC and PAL video output signals.
- Language: selects between English and Japanese camera languages.
- Beep: turns the camera beep on and off.
Pressing the Display button with the Playback menu up pulls up the basic playback menu, offering all of the above options except for the Protect and Screen Saver settings.![]()
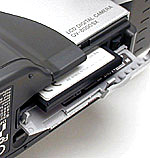
Image Storage and Interface
The QV-8000SX utilizes CompactFlash (Type I) as its image storage medium. An 8MB card comes with the camera, with upgrades available to 15MB, 30MB, 48MB and 64MB. (Third parties currently (January 2000) offer Type I CF cards in capacities as large as 128MB.) An interesting feature is that the QV-8000SX creates an HTML file with four card browser options available (compatible with Microsoft Internet Explorer 4.01 or later and Netscape Communicator 4.5 or later). QuickTime 3 or later is required to play back movie images on your computer. The four different card browser formats let you choose how much information is recorded with each image (a very detailed chart in the manual explains the settings). We found the HTML image indexes very handy for viewing pictures shot with the camera, and for seeing the exposure settings they were shot with. The four "card browser" options provide a range of display options designed to offer as much functionality as possible with a variety of different web browsers. (The more sophisticated options even include JavaScript code for a web browser-based slide-show function!)![]()
The QV-8000SX organizes images into storage folders, assigned numbers from 100 to 998. Within each folder, images are numbered from 0001 to 9900 and each folder contains up to 100 files. An extremely detailed directory tree in the manual shows exactly how information is encoded onto the CompactFlash card by the camera.![]()
You can protect individual images on the CompactFlash card through the Playback menu in Playback mode, preventing accidental deletion of images. (Although, as noted earlier, it's important to remember that "protected" images will still be erased when you reformat the memory card.) If you want to erase images, the Delete menu in Playback mode gives you the option of deleting individual images, a folder or all images that aren't protected.![]()
Below are the approximate numbers of still images that will fit on an 8MB card and their compression ratios:![]()
Still Images:![]()
| Resolution/Quality vs Image Capacity | | | ||
| | Compression | | Compression | |
| Fine Quality | | | | |
| Normal Quality | | | | |
| Economy Quality | | | | |
![]()
 Video Out
US and Japanese models of the QV-8000SX come with an NTSC video connection cable (European models come with PAL) for connecting the camera to a television set. (Provided the set has a separate "raw video" input.) This connection enables the TV to act as the LCD monitor when composing and playing back images. As we noted earlier, this can be helpful in manually focusing on macro subjects, or in studio settings where you have to interact with the subject from in front of the camera. (Kid photography, etc.) TV playback can also be handy when using the camera as a presentation device.![]()
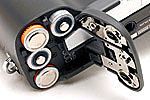 Power
Power
The QV-8000SX runs on four AA alkaline, lithium, NiCd or NiMH batteries. An AC adapter comes with the camera, useful for conserving batteries when playing back images, connecting to the computer or television, or capturing long time-lapse sequences. Casio estimates that a standard set of AA alkaline batteries allows you to record up to 400 shots (1020 for lithium and 620 for NiMH) and they recommend keeping the flash turned off when not in use and taking advantage of the power save settings in the setup menus to help conserve battery power. We feel per-shot ratings of this sort are of relatively little value in deciding how long you'll actually be able to use a camera, particularly with ones like the QV-8000 that rely on their LCD screen as a viewfinder. (How many times do you simply run off 500 shots as fast as you can trip the shutter?) A more useful rating would be how long the camera will operate in various modes with typical NiMH rechargeable batteries. The QV-8000 has fairly low power consumption for a camera with such a large LCD display, but by the same token consumes more power than cameras offering optical viewfinders. Overall, the QV-8000 seems to do a good job of regulating its power consumption (turning off the LCD screen when it's charging the flash, for instance) to maximize battery life. The 510 mA power consumption in capture mode leads us to estimate a typical battery life of about 2 hours with 1200-1300 mAh NiMH cells. (This is a bit less than the batteries' capacity rating would suggest, because the batteries are rated at a relatively low power drain, and total capacity decreases as the load increases.) We actually tested the power consumption of the QV-8000 with a couple of sets of batteries, with wildly varying results: A set of 1200mAh cells lasted just less than an hour, while a new set of 1600 mAh units (recently released by Kodak) powered the camera in capture mode continuously for two hours and 35 minutes!![]()
The table below shows the power consumption figures we measured in various operating modes, via the external power connector.![]()
| | |
| Capture Mode, w/LCD | |
| Capture Mode, half pressed shutter | |
| Memory Write (transient) | |
| Flash Recharge (transient) | |
| Image Playback | |
Included Software
The QV-8000SX comes with a USB, serial and Macintosh adapter cable for connecting and downloading images to a computer. A CD packaged with the camera comes with Casio's PhotoLoader, Panorama Editor, Picture Works Technology's MediaCenter with a trial version of their Web Publisher add-on for it, Apple's QuickTime for Windows, Adobe ActiveShare, Adobe Acrobat Reader, Internet Explorer 5.0 as its main software applications (a USB driver and various other odds and ends also come on the CD for assistance in installation). Unfortunately for Mac users, the included software is only compatible with Windows 95, 98 and NT 4.0. The included cables support the Mac platform, but Mac users will need to order a copy of PhotoLoader for the Mac for $9.99 extra.
Immediately when you insert the software CD, a menu comes up with options to install the various software applications, find out about the software, register your camera online, go directly to the Casio website, open the accessory catalog or fill out an accessory order form. The PhotoLoader software is responsible for downloading images and movies from the camera onto your computer. Once the images have been moved, Picture Works Media Center allows you to organize, enhance or prepare images for the Internet. The trial version of Picture Works Web Publisher allows you to create customized web pages in 30 seconds or less (up to 15 pages in the trial version). Adobe Active Share lets you perform minor image correction and connects you with ActiveShare.com for instant image sharing with family and friends. Quicktime 3 is the medium for movie playback and works with the included copy of Internet Explorer. And finally, Panorama Editor lets you connect your recorded panoramic shots and play back 360 degree images. Overall, a very complete software package, albeit one limited to Windows users.